#Lived-In Color: A Natural Hair Transformation
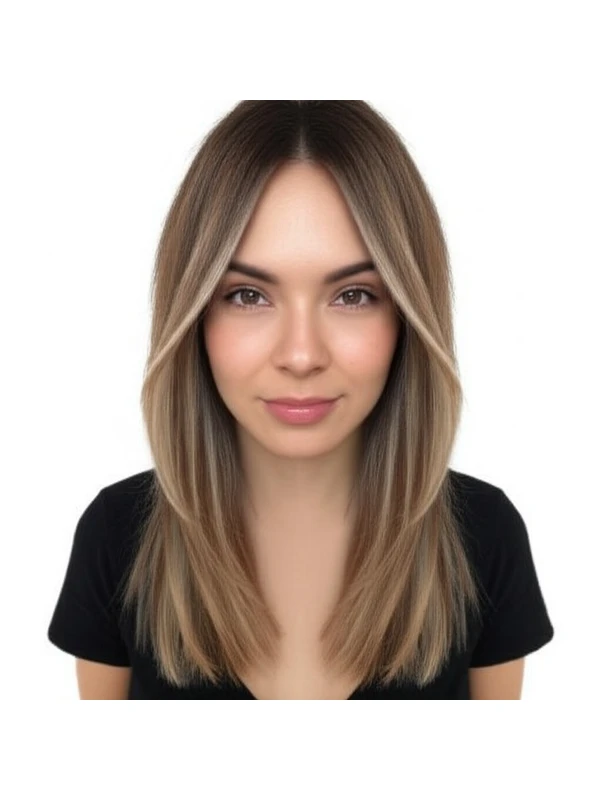
Lived-in color is a popular hair coloring technique designed to mimic the effortless look of naturally sun-kissed or subtly highlighted hair. It prioritizes a soft, blended result that grows out gracefully and requires minimal upkeep. Think "I woke up like this" hair – but with a little professional help!
#1. What Is Lived-In Color & How Does it Work?
Lived-in color focuses on creating dimension without harsh lines or obvious highlights. It’s less about precise placement and more about an overall, blended effect. Here's how stylists typically achieve this look:
- Tools: Primarily uses freehand painting techniques with brushes of varying sizes. Foils are sometimes used for added lift in specific areas but aren't essential to the core technique.
- Placement: The colorist strategically paints highlights around the hairline, face-framing sections, and throughout the hair to create a natural flow. They focus on areas that catch the light best. The application is often less concentrated at the crown of the head for a softer overall result.
- Timing: Processing time varies based on desired level lift and individual hair characteristics. The colorist will monitor carefully, usually checking every few minutes to ensure even development. Rinsing and toning follow.
#2. What Can Lived-In Color Achieve?
Lived-in color is incredibly versatile! It’s a great choice for several goals:
- Dimension: Adds depth and visual interest to flat, one-dimensional hair colors.
- Root Blur: Creates a gradual transition from darker roots to lighter ends, minimizing the need for frequent root touch-ups. This isn't full "root shadow" but offers a softer blend than traditional highlights.
- Face Framing: Brightens and softens facial features by strategically placing brighter pieces around the face.
- Subtle Coverage: Can help to mask grays or slightly correct brassiness, although it’s not designed for complete color correction.
#3. Who Is Lived-In Color For?
This technique is adaptable but works best with certain characteristics:
- Natural Hair Level: Looks beautiful on a wide range of natural hair colors from dark brown to light blonde.
- Undertone: Can complement both warm (golden, red) and cool (ashy, blue) undertones. The stylist will adjust the tones used to enhance your complexion.
- Hair Type/Texture: Suitable for all textures – straight, wavy, curly, coily! The placement and intensity of highlights are adjusted based on curl pattern or hair density.
- Fine Hair: Lived-in color can add volume and movement.
- Thick Hair: Creates dimension without feeling heavy.
- Coily/Curly Hair: Highlights definition and bounce while minimizing damage (when done correctly).
- Hair Length: Works well on all lengths, from bobs to long hair. Shorter styles benefit from face-framing highlights.
- Lifestyle: Ideal for those who want a low-maintenance look that grows out gracefully – perfect for busy individuals or anyone averse to frequent salon visits.
#4. Lived-In Color vs. Similar Techniques
Understanding the differences is key:
- Balayage: A similar freehand painting technique, but balayage often focuses on more dramatic contrast and bolder placement. Lived-in color aims for a softer, more blended result.
- Foilyage: Combines balayage with foils to achieve greater lift and brightness. Lived-in color rarely utilizes foils extensively.
- Highlights: Traditional highlights use foils for precise placement and even lifting – resulting in defined lines of color. Lived-in color avoids these sharp contrasts.
- Root Smudge/Shadow Root: These techniques focus solely on blending the roots to create a soft transition, whereas lived-in color encompasses the entire hair coloring process. A shadow root can be incorporated into a lived-in color service for added softness.
#5. Maintenance & Longevity
Planning ahead is crucial:
- Salon Timing: Typically requires salon visits every 4-6 months, depending on growth rate and desired intensity.
- Toner/Gloss Refresh: A toner or gloss can be applied between full color appointments to maintain the tone and brightness of the highlights (every 8–12 weeks).
- Grow-Out Behavior: The blended nature means roots grow out subtly, avoiding harsh lines – a major benefit!
- Budget/Time Planning: Expect to spend $150-$400+ per salon visit. Toner or gloss refreshes are typically $50 - $100+.
#6. At-Home Care Tips for Lived-In Color
Protecting your investment is key:
- Wash Cadence: Reduce washing to 2–3 times a week to preserve color vibrancy and moisture.
- Heat Protection: Always use heat protectant spray before using styling tools (blow dryers, straighteners, curling irons).
- Color-Safe Care: Use shampoos and conditioners specifically formulated for colored hair. Sulfate-free formulas are generally best. Consider a purple shampoo or conditioner to combat brassiness (use sparingly!).
- Deep Conditioning: Incorporate deep conditioning treatments weekly to maintain moisture and prevent breakage.
#7. Pros & Cons of Lived-In Color
Pros:
- Low maintenance grow out
- Natural, effortless look
- Adds dimension and brightness
- Versatile for various hair types and lengths
- Softens facial features
Cons:
- Can be more expensive than traditional highlights initially.
- Not suitable for drastic color changes or complete gray coverage.
- Requires a skilled stylist to achieve the desired blended effect.
#8. Salon Consultation Script Prompts (for your stylist)
To ensure you get exactly what you want, prepare with these questions/topics:
- What is my natural hair level and undertone?
- Can I see examples of lived-in color results you’ve achieved on similar hair types?
- What shade(s) will be used to complement my skin tone?
- How much contrast are we aiming for (subtle or more noticeable)?
- How often do you recommend salon visits and toner/gloss refreshes?
- Can you explain the placement of highlights based on my face shape and hair texture?
- What at-home care products would you recommend to maintain my color?
#9. Frequently Asked Questions
- Can I get lived-in color if I have dark brown/black hair? Yes! It will create beautiful, subtle dimension but the lift achieved will be less dramatic than on lighter bases.
- Will lived-in color damage my hair? As with any coloring process, there's potential for some damage. A skilled stylist uses gentle techniques and prioritizes your hair’s health.
- Can I do lived-in color at home? While possible, achieving the blended effect requires significant skill. It’s best left to a professional for optimal results and minimal damage risk.
- How long does the process take? Typically 2-4 hours, depending on hair length, density, and desired result.
- What if I want more brightness after my lived-in color appointment? A toner or gloss can be added to enhance the lightness of your highlights.
- Is lived-in color suitable for gray coverage? It provides subtle blending but isn't intended for complete gray coverage. A combination technique might be necessary.
- Will I still need root touch-ups? While grow out is softer, you’ll likely need a refresh every 4-6 months to maintain the overall look and blend any new growth.
- Can lived-in color change my hair tone (e.g., from warm to cool)? Absolutely! The stylist can incorporate cooler or warmer tones during the process to achieve your desired shade.
#Lived-In Color: Effortless Beauty That Evolves
Lived-in color isn't just a trend; it’s a philosophy about hair color – embracing natural variation and movement for an effortlessly beautiful look that grows out gracefully. Think sun-kissed highlights, soft shadows, and dimension without harsh lines or obvious roots. It mimics the way your hair naturally changes with light and seasons.
#Finding Your Lived-In Color Palette: Face Shape & Proportions
Lived-in color isn’t one size fits all. It needs to complement your features and overall look. Consider these factors:
Face Shape:
- Oval: You can pull off almost any lived-in technique! Play with placement of highlights for added dimension.
- Round: Strategic highlighting around the crown and face frame can add length and definition. Avoid concentrated color on the sides, which can widen the face.
- Square: Soften angles with blended highlights and lowlights along the jawline. Avoid harsh lines.
- Heart: Highlights placed towards the lower portion of your hair will balance a wider forehead.
- Long: Horizontal dimension through balayage or babylights can visually shorten the face.
Body Proportions & Height: Taller individuals with longer torsos often look fantastic with richer, deeper tones that ground them. Shorter individuals may find lighter shades enhance their features and create a more balanced silhouette. Consider your overall body shape—apple, pear, hourglass – as color can be used to visually adjust proportions.
#Texture & Density: Matching Color Technique to Hair Type
Your hair's texture and density heavily influence how lived-in color will appear and how it’s best applied:
- Fine/Thin Hair: Babylights or very fine slices of highlights are ideal, as thicker sections can look chunky. Opt for lighter tones to add visual volume.
- Medium Hair: Offers the most versatility! Most lived-in techniques work well, but consider your hair's natural undertones (warm, cool, neutral).
- Thick/Coarse Hair: Larger pieces of balayage or foil highlights can create beautiful dimension without looking sparse. Richer tones often look stunning on thicker hair.
- Straight Hair: Highlights show beautifully and maintain their definition longer.
- Wavy Hair: Lived-in color enhances the natural wave pattern, creating a soft, textured effect.
- Curly/Coily Hair: Focus on highlighting the curl's crown to add lift and dimension. Be mindful of banding – ensure highlights are blended seamlessly within the curls.
#Maintenance & Grow-Out: The Beauty of Low Commitment
One of the biggest appeals is its low-maintenance nature. But here’s what you need to know:
- Root Smudge: A root smudge, where color gradually transitions from darker roots to lighter ends, is key for a seamless grow out.
- Toning: Regular toning (every 6-8 weeks) helps maintain the desired undertones and prevent brassiness. The frequency depends on your starting level and how much lightening was involved.
- Deep Conditioning: Essential! Lived-in color often involves some degree of lifting, so keeping hair hydrated is crucial.
- Professional Touch-Ups: Plan for touch-ups every 4-6 months to refresh the highlights and maintain a balanced look.
#The Grow-Out Roadmap: Embracing the Evolution
Lived-in color is about embracing change. Here’s how it unfolds:
- Initial Application: Focus on strategic placement of highlights or balayage, leaving roots darker.
- First 6-8 Weeks: Enjoy the fresh look! Root smudge is most noticeable here.
- Months 2-4: Roots begin to grow in, creating a more gradual transition. Toning becomes important.
- Months 5-6+: The lived-in effect really shines as the highlights and roots blend naturally. Embrace the variation!
#FAQs: Your Lived-In Color Questions Answered
- Can I do lived-in color on dark hair? Absolutely! It requires more lifting, but the contrast can be stunning.
- Is lived-in color damaging to my hair? Less so than traditional highlights because of fewer harsh lines and less frequent touch-ups. Proper care is still essential.
- How long does it take to achieve a lived-in look? It often takes 1-2 appointments, especially for darker bases or significant lightening.
- What’s the difference between balayage and foil highlights for a lived-in effect? Balayage is hand-painted for a softer, more diffused blend. Foil highlights offer greater control over lift and placement. Both can achieve a lived-in look!
- Can I maintain lived-in color at home? Toning is best left to professionals, but you can use color-safe shampoos and conditioners designed for your hair type & tone.
- My highlights are looking brassy – what should I do? Schedule a toning appointment with your stylist! Purple or blue toners can neutralize unwanted warmth.
- I have graying hair - is lived in colour suitable? Yes, but consultation with a professional is key to ensure the grey hairs blend seamlessly and that color doesn’t fade too quickly. A demi-permanent option may be best for less commitment.
#Considering Your Undertones
Knowing your skin's undertone (warm, cool, or neutral) helps select complementary colors:
- Warm: Gold, copper, honey blonde – these tones enhance a warm complexion.
- Cool: Ashy blondes, icy browns – these shades complement cooler skin tones.
- Neutral: You can generally wear a wider range of colors!